This quarter (Fall 2024), I am trying out GitHub Classroom to manage assignments for my courses.
Are you prepared to use GitHub Classroom?
If you have done all of the items on this list before, you should be able to use GitHub Classroom without issues.
- Made a commit
- Made a pull request
- Made a new branch
- Made a GitHub Issue
- Forked a GitHub repository
- Added a remote to your local copy of a GitHub repository
- Cloned a GitHub repository
- Watched a GitHub repository
If you haven’t done some of the above items, please take some time to get familiar. There are many excellent (and some not-so-excellent) tutorials online. The best way to learn is to follow along with the tools (git and GitHub) while you go through a tutorial. There are many interfaces to git, included the command line tool, several desktop apps, extensions to IDEs including VSCode and Emacs, and probably more. If you have knowledgeable friends, ask them what they use.
Read more about working with git remotes here: https://git-scm.com/book/ms/v2/Git-Basics-Working-with-Remotes Learn more about git and GitHub with interactive skills development exercises here: https://github.com/skills
Using Github Classroom
This section contains some notes on using GitHub Classroom.
How GitHub Classroom works

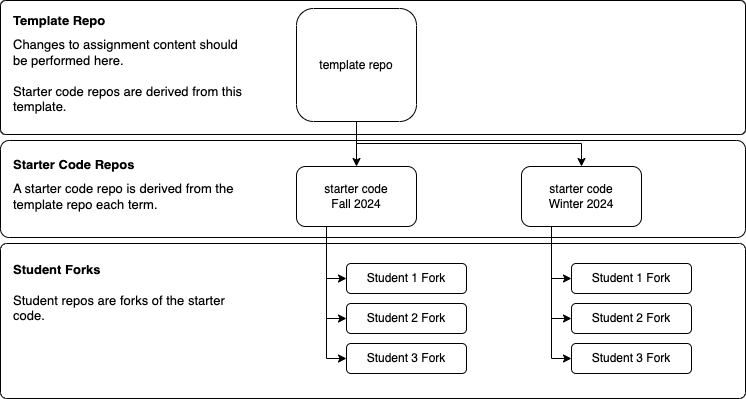
For a given academic term (quarter), each assignment has:
- A template* GitHub repository that persists across terms. As a student, this template repository will not be visible to you.
- A starter code repo used for the current term. Students fork this repo to start working on an assignment. As a student, this starter code repo should be visible to you, but you will not have write access.
- Student forks of the starter code repo where students submit their work for the current term. As a student, you should have write access to your own fork.
How can I submit work on GitHub classroom?
Submissions are made by pushing to your fork. In other words, your submission is whatever content is on your fork on GitHub at the time of the assignment deadline.
Please be aware that this requires you to add and commit your local changes and push them to the remote repo. I cannot access your machine (a good thing), so there is no way for me to see work that is not on your remote.
Setting up the starter code repository as an upstream remote
The starter code repository contains starter code, assignment descriptions, etc. As a student, your copy of the assignment is a fork of the starter code repository.
You are strongly encouraged to set the starter code repository as an upstream remote. This will allow you to pull any changes from the upstream remote as you see fit. For example, you might set up a cron job to notify you if the assignment has changed in the last day.
Sometimes the starter code repository will be updated after the assignment is released, for example to correct mistakes.
To set the starter code repo as an upstream remote, you can use the following command:
git remote add upstream <starter-code-repo-url>To get changes from the upstream remote:
git fetch upstream
To combine changes from the upstream remote with your current work:
git merge upstream/<upstream-default-branch>
In most cases fall2024.
It’s my responsibility to make sure that you have access to the template repo, otherwise git fetch will not work. If you encounter an error with git fetch, let me know via email. Include a printout of the error message, preferably copied as text rather than screenshotted.